Sponsored

nGauge wiring with boost plus box

jchristena

Well-Known Member
Joined
Nov 18, 2015
Threads
17
Messages
113
Reaction score
52
Location
Austin, TX
Vehicle(s)
2015 GT
For those who may be wondering...

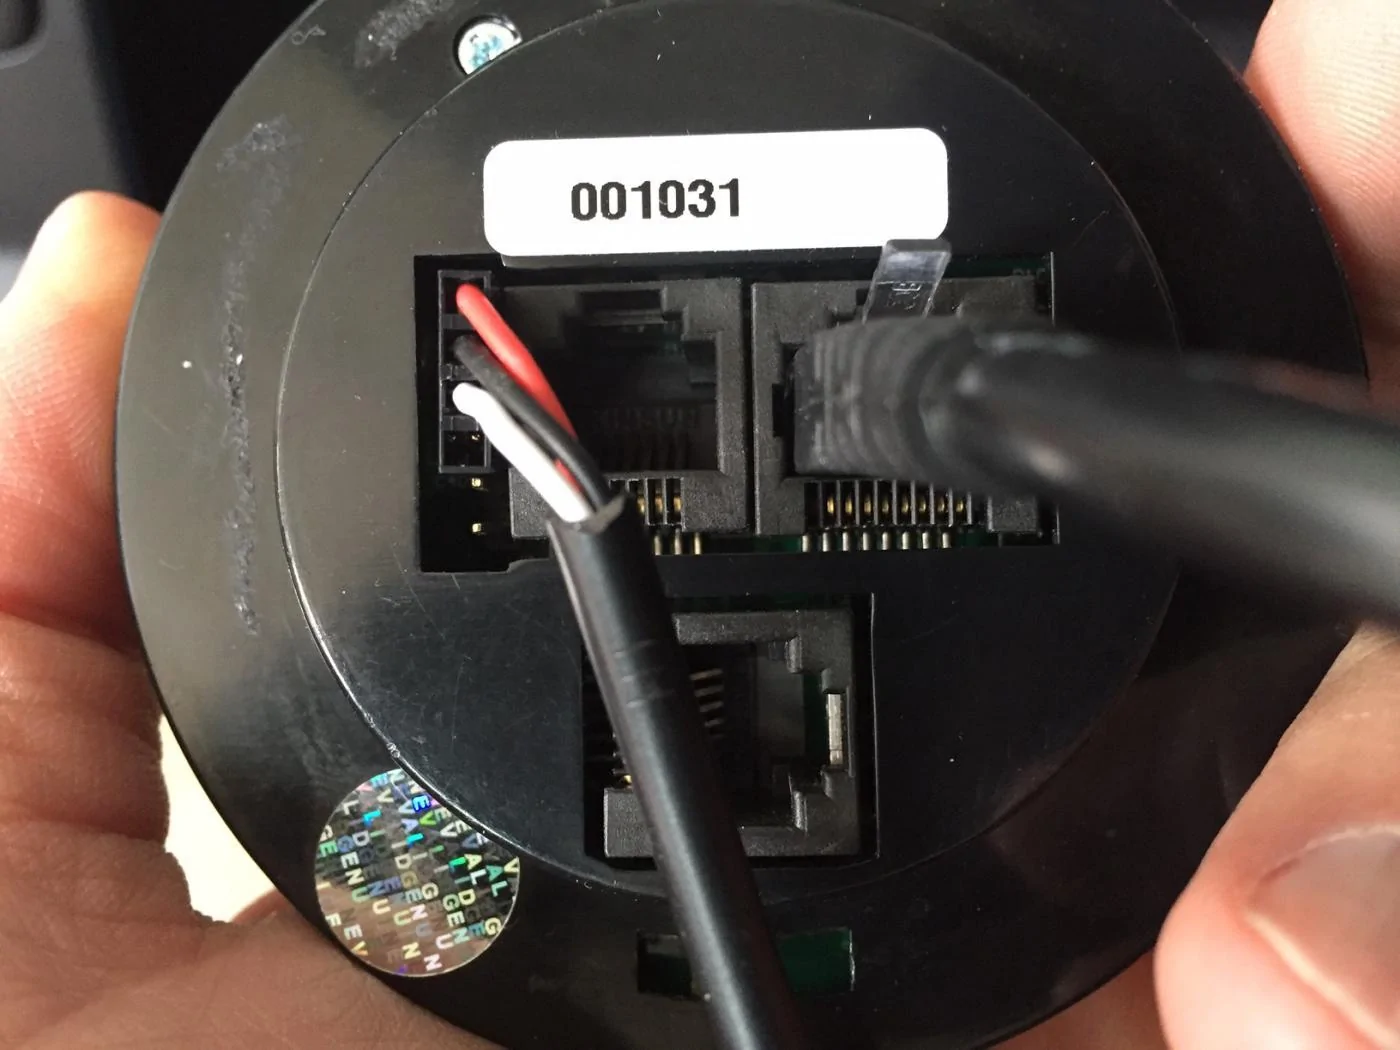
Lund Racing sent me a pic of the proper plug orientation for the nGauge w/ the boost plus box. FYI, there are 6 pins on the nGauge and it is a pin input connector. Orient the red pin in the connector with the little arrow that is barely visible on the circuit board of the nGauge... The pic is directly from Lund Racing.
boostPlusnGauge.webp
Sponsored


GotStanged

Active Member
Joined
Jan 28, 2016
Threads
14
Messages
38
Reaction score
2
Location
Deer Park, tx
First Name
Josh
Vehicle(s)
2015 Mustang Gt PP
For those who may be wondering...

Lund Racing sent me a pic of the proper plug orientation for the nGauge w/ the boost plus box. FYI, there are 6 pins on the nGauge and it is a pin input connector. Orient the red pin in the connector with the little arrow that is barely visible on the circuit board of the nGauge... The pic is directly from Lund Racing.
Where does the other connector go? And where di you hook the box at? Please post pictures.
 
OP
OP

jchristena

Well-Known Member
Joined
Nov 18, 2015
Threads
17
Messages
113
Reaction score
52
Location
Austin, TX
Vehicle(s)
2015 GT
I don't have any pictures...honestly there isn't much to show. Let me detail what I did here and if you still need pics, I'm happy to pull the fuse panel and get one for you.

The boost plus controller comes with 1 output harness(the 4 pin connector that goes to the nGauge), 1 input harness(the little three pin connector which isn't used yet), power, ground and vacuum/boost input. For my install, I mounted it in the passenger footwell fuse panel area since everything you need is right there...and it is easily concealed.

1. Ground. Above the fuse panel in the footwell, there are two ground screws above the fuse panel itself. I don't do any crimp connectors if I can help it. When I do, I solder the wire to the connector. So, get an electrical ring connector, attach the black wire from boost controller to the connector and screw it down. Note, there are apparently other locations to ground it, but this worked for me. It was a pain in the ass to get to. Make sure you disconnect the negative battery terminal!
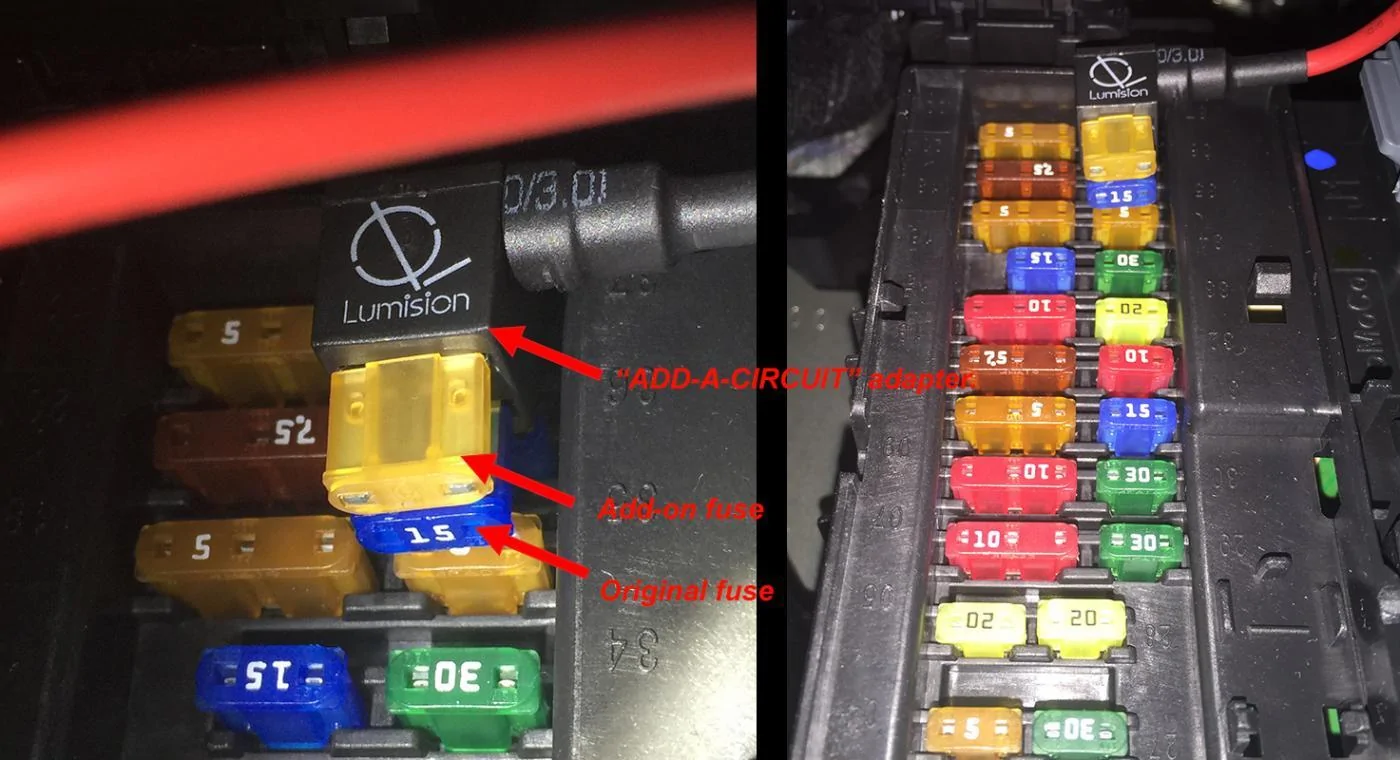
2. Power. Get a micro2 add-a-circuit. This one or similar.
http://www.amazon.com/gp/product/B00OZGA8O8
Use fuse#37. This is the only fuse(according to the audio forum so someone correct me if I'm wrong) that is power with the key on only. There is no retained accessory power here. I guess retained power really wouldn't matter in this install anyway...but whatever. Put the original 15A blue fuse in the bottom slot and the new fuse(I used the 5A) in the top slot. Plug it into slot 37.
3. 4 pin output harness. If you pull each side of the glove box inwards, you can completely pull it down and let it hang. This will give you complete access behind that section of the dash. Route the harness up to where ever you mounted your gauge. Plug it in as stated in my first post in this thread.
4. The three pin input harness. Let it hang or zip tie it up neatly. If you ever add a new controller which Lund is releasing at some point, it will plug in here. I intend to run oil temp. It will reflect on nGauge analog 1 input.
5. Attach a vacuum line...I think I used 5/16"...but use whatever is snug. Now, this part kinda sucks. You have to pull the carpet back on the passenger footwell, just a little to where you can see the main harness going through the firewall. Now, jack up the car and remove the plastic fender liner. When you do, you'll see a rubber grommet(big oval one where the main harness goes through.). You'll see a little rubber nipple on it. I made a slit right to the side of that and fed the vacuum line through it from the outside of the car. Go back inside and grab the line and gently pull it through. Attach it to the controller and then go back outside and gently take up the slack. Don't make it too tight. You can run that vacuum line right along the main harness into the engine bay very easily. Do that and zip tie it out of the way or connect it to the engine vacuum/boost.
6. Zip tie the boost controller to a harness wire or whatever. Mine is actually just hanging there and I think that's fine.
7. Fire up the car and go into your nGauge settings. Go to inputs and find analog 2. Scroll through the values and you'll see boost plus controller. Go back into gauge mode and change whatever signal you want to read on nGauge analog 2. If you have no vacuum source connected, I believe it will read -1.7x psi give or take. According to LR, this is correct. I did this to make sure I had a known good reading before connecting the engine vacuum/boost. Go back to gauge mode and you should see the vacuum on the nGauge generally reflect what is shown for vacuum/boost in your gauge cluster mode.

There ya go. A little long winded, but I hope this helps. It resulted in a very clean install...and you can't see any wires. I mounted in the AC vent but it would be just as easy to run the input line to wherever you want.

I'll repost a pic from the audio forum. Their install was for a radar detector, but works the same for this. Sorry, I don't remember the OP or I'd give credit.
159564897.1CUsKX8R.IMG_4486c.webp
 

evo8904

I'm a member???
Joined
Nov 20, 2014
Threads
29
Messages
2,503
Reaction score
778
Location
Tampa
First Name
Luther
Vehicle(s)
2017 Ram 4x4
I scrolled through and found analog 2 but it doesn't say boost plus controller. Lund really should include instructions with this shit. At idle the analog 2 that I found reads around .3
 
OP
OP

jchristena

Well-Known Member
Joined
Nov 18, 2015
Threads
17
Messages
113
Reaction score
52
Location
Austin, TX
Vehicle(s)
2015 GT
You have to go to Diagnostics -> inputs (I think) and set what the input is. It is outside of the gauge mode on the first screen. I'll take some pics here in a bit if you can't find it.

Agreed on the instructions. Both John and Jon II were responding to me on support for the controller. Both apologized and said they are working on instructions.
 

Sponsored

evo8904

I'm a member???
Joined
Nov 20, 2014
Threads
29
Messages
2,503
Reaction score
778
Location
Tampa
First Name
Luther
Vehicle(s)
2017 Ram 4x4
You have to go to Diagnostics -> inputs (I think) and set what the input is. It is outside of the gauge mode on the first screen. I'll take some pics here in a bit if you can't find it.

Agreed on the instructions. Both John and Jon II were responding to me on support for the controller. Both apologized and said they are working on instructions.
Thanks bro! I just wired everything up this morning. My car looked like a wire mess lol. I was wiring up a cut off switch for my meth/water injection and a flow gauge too.
 
OP
OP

jchristena

Well-Known Member
Joined
Nov 18, 2015
Threads
17
Messages
113
Reaction score
52
Location
Austin, TX
Vehicle(s)
2015 GT
Yea man. You get it going? Or do you need the pics still?
 

evo8904

I'm a member???
Joined
Nov 20, 2014
Threads
29
Messages
2,503
Reaction score
778
Location
Tampa
First Name
Luther
Vehicle(s)
2017 Ram 4x4
Yeah, I went to diagnostic then settings and then other inputs. I don't see the boost plus anywhere. I'm probably going to contact Lund and raise a little hell.
 

evo8904

I'm a member???
Joined
Nov 20, 2014
Threads
29
Messages
2,503
Reaction score
778
Location
Tampa
First Name
Luther
Vehicle(s)
2017 Ram 4x4
Lund said that I need to update my ngauge. I'll give that a try.
 

evo8904

I'm a member???
Joined
Nov 20, 2014
Threads
29
Messages
2,503
Reaction score
778
Location
Tampa
First Name
Luther
Vehicle(s)
2017 Ram 4x4
Got it working today, it's pretty cool. I like seeing the boost psi in my logs. Hit 12.4psi at 7400 today.
 

Sponsored
OP
OP

jchristena

Well-Known Member
Joined
Nov 18, 2015
Threads
17
Messages
113
Reaction score
52
Location
Austin, TX
Vehicle(s)
2015 GT
Awesome man. Glad it worked out!
 

Jeff_oddo

Well-Known Member
Joined
Apr 23, 2015
Threads
69
Messages
1,072
Reaction score
129
Location
Colorado Springs, CO
First Name
Jeff
Vehicle(s)
Mustang GT Premium
Installed my boost+ box and it was simple!
 

Chargedguard5.0

Well-Known Member
Joined
Dec 31, 2014
Threads
10
Messages
1,067
Reaction score
222
Location
Dallas
Vehicle(s)
2015 GT
Stupid question but how do you update the ngauge? I just got one from another person and there's no instruction manual. I put the sd card in the computer and couldn't find a update button.
 

Jeff_oddo

Well-Known Member
Joined
Apr 23, 2015
Threads
69
Messages
1,072
Reaction score
129
Location
Colorado Springs, CO
First Name
Jeff
Vehicle(s)
Mustang GT Premium
Stupid question but how do you update the ngauge? I just got one from another person and there's no instruction manual. I put the sd card in the computer and couldn't find a update button.
Go on Lund Racing's website. There is a "how-to" section under support. Everything you want to know about the nGauge is there
Sponsored


Top