John577
Well-Known Member
- Thread starter
- #1
Guys,
After a long wait, here's my thread about my modifications on the lights.
Sorry for the title, but "The installation thread for Swapping the entire HID from 25w D8S to 35w D3s with an installation of the tri-bars and the sequential turn " was a bit to long :lol:
First thing you have to do, is to remove bumper + lights from the car.
What is the look of the car after removing the stuff ?
This :

But after, you can add/remove Bulbs and ballasts without removing bumper and lights, but your hands needs to be very flexible
I removed the ballast without removing the light from the car :
PART 1 : Headlights
You have 2 choices to put the new Bulbs into the lights.
1. Cut the notch in the light :
2. Modify the bulb to go inside :
To modify the bulb, you simply need a tool like a "Dremel" to made a hole that fits the little notch in the light. Like this :
D8S left, D3S right
Difference in the connectors of the 2 bulbs :
On the D8S bulb, we have a piece of plastic inside the connector. So need a new cable when you swap it for another model.
I used the method 1.
So with this method, you can now put all the bulbs into the car (D1S, D2S, D3S, ...)
The ballasts have exactly the same form so they are Plug&play. You just need a cable to power the new bulbs.
D8S HID needs : D8S ballasts + D8S Bulb + D8S bulb alimentation cable
D3S HID needs : D3S ballasts + D3S Bulb + D3S bulb alimentation cable
The Ballast's power cable is still the same, you remove it from the D8S ballast and you plug it to your new ballast. That's all.
PART 2 : Tri-bar + Sequential turn
Mmm, for this point I can put Papinist's entire thread.
I've done exactly the same as he done on his car.
[MENTION=12253]papinist[/MENTION], I share your links here again, you made a total good job and it really helped me to do my mod. Thanks again mate
Papinist's PART 1 :
http://www.mustang6g.com/forums/showpost.php?p=951118&postcount=27
Papinist's PART 2 :
http://www.mustang6g.com/forums/showpost.php?p=951120&postcount=28
And sadly, I saw that I don't have pictures for this steps ... :frusty:
So I will be a bad boy and stole papinist's pictures :headbonk: :headbonk:
I hope you will not blame me for that ...
I will take some pictures tonight of my car, so I can update the pictures with my car
But for now, you have the complete story
Here's the short version without pictures :
Here's the story with the stolen pictures ...  :
:
+12V for DD modul -> I used the power cable from the wipers
Ground for DD modul -> I used a ground that I found in the area of the headlights
+12V for turn -> Sequential turn also have a modul that need power, for that, I plug the cable to the fuse box to have always power (with a new fuse)
Turn cable -> Plug it to you Stock turn cables to activate turn
Connect it to the (+) of your turn signal cable
Here's where I put the DD modul :
To attach the cables I used this. Very fast and very good to plug it to your stock cables.
And this for the connexion to the fuse box :
And this to adjust the lenght of the cables :
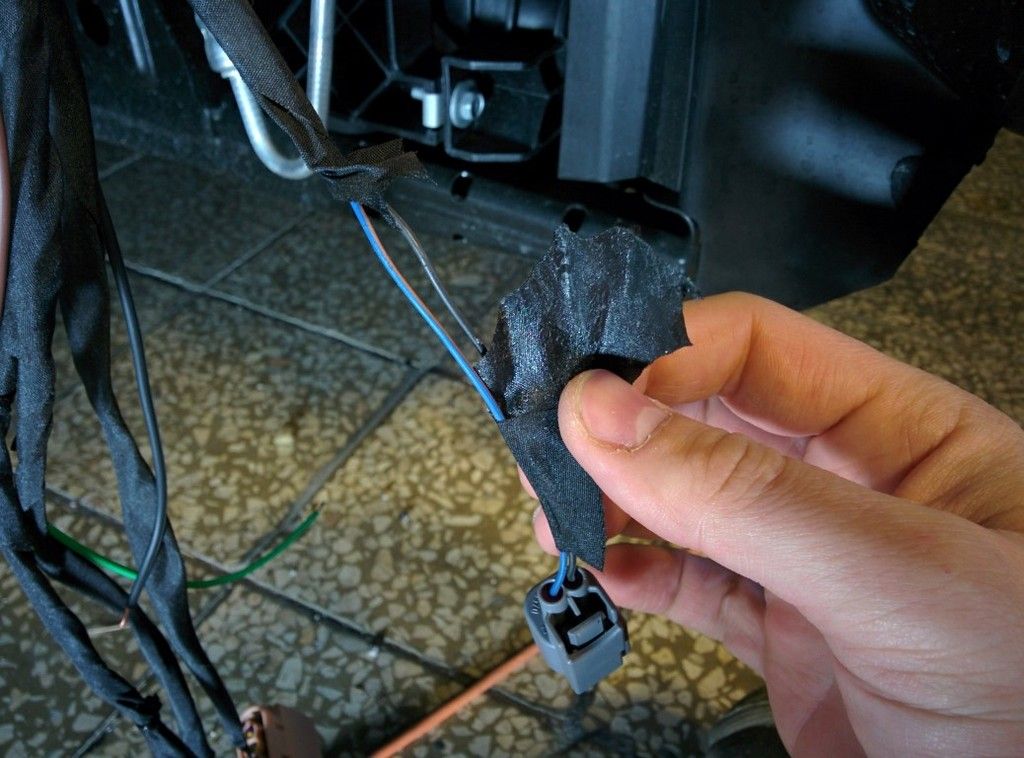
And the last tool that you really need to have, THE ELECTRICIAN TAPE
So that way you can isolated your cables.
I also installed resistor to my car, so now, I have no longer the turn signal that flashes very fast on the Dash.
That's how to plug your resistor for the turn signal, very easy.
And after a long night, the finished view is just amazing !!! :cheers: :cheers: :cheers:
Difference between D8S and D3S in a night shot :
D8S left, D3S right :
Same here, D8S left, D3S right :
Some videos :
- tri-bar + sequential turn in action
[ame]
- The Blue color of the CBI's :
[ame]
Cheers :cheers:
After a long wait, here's my thread about my modifications on the lights.
Sorry for the title, but "The installation thread for Swapping the entire HID from 25w D8S to 35w D3s with an installation of the tri-bars and the sequential turn " was a bit to long :lol:
First thing you have to do, is to remove bumper + lights from the car.
What is the look of the car after removing the stuff ?
This :


But after, you can add/remove Bulbs and ballasts without removing bumper and lights, but your hands needs to be very flexible
I removed the ballast without removing the light from the car :

PART 1 : Headlights
You have 2 choices to put the new Bulbs into the lights.
1. Cut the notch in the light :

2. Modify the bulb to go inside :
To modify the bulb, you simply need a tool like a "Dremel" to made a hole that fits the little notch in the light. Like this :

D8S left, D3S right

Difference in the connectors of the 2 bulbs :
On the D8S bulb, we have a piece of plastic inside the connector. So need a new cable when you swap it for another model.

I used the method 1.
So with this method, you can now put all the bulbs into the car (D1S, D2S, D3S, ...)
The ballasts have exactly the same form so they are Plug&play. You just need a cable to power the new bulbs.
D8S HID needs : D8S ballasts + D8S Bulb + D8S bulb alimentation cable
D3S HID needs : D3S ballasts + D3S Bulb + D3S bulb alimentation cable
The Ballast's power cable is still the same, you remove it from the D8S ballast and you plug it to your new ballast. That's all.

PART 2 : Tri-bar + Sequential turn
Mmm, for this point I can put Papinist's entire thread.
I've done exactly the same as he done on his car.
[MENTION=12253]papinist[/MENTION], I share your links here again, you made a total good job and it really helped me to do my mod. Thanks again mate
Papinist's PART 1 :
http://www.mustang6g.com/forums/showpost.php?p=951118&postcount=27
Papinist's PART 2 :
http://www.mustang6g.com/forums/showpost.php?p=951120&postcount=28
And sadly, I saw that I don't have pictures for this steps ... :frusty:
So I will be a bad boy and stole papinist's pictures :headbonk: :headbonk:
I hope you will not blame me for that ...
I will take some pictures tonight of my car, so I can update the pictures with my car
But for now, you have the complete story
Here's the short version without pictures :
- +12V for DD modul -> I used the power cable from the wipers
- Ground for DD modul -> I used a ground that I found in the area of the headlights
- +12V for turn -> Sequential turn also have a modul that need power, for that, I plug the cable to the fuse box to have always power (with a new fuse)
- Turn cable -> Plug it to you Stock turn cables to activate turn
Here's the story with the stolen pictures ...
: +12V for DD modul -> I used the power cable from the wipers


Ground for DD modul -> I used a ground that I found in the area of the headlights

+12V for turn -> Sequential turn also have a modul that need power, for that, I plug the cable to the fuse box to have always power (with a new fuse)

Turn cable -> Plug it to you Stock turn cables to activate turn
Connect it to the (+) of your turn signal cable
Here's where I put the DD modul :

To attach the cables I used this. Very fast and very good to plug it to your stock cables.

And this for the connexion to the fuse box :

And this to adjust the lenght of the cables :

And the last tool that you really need to have, THE ELECTRICIAN TAPE
So that way you can isolated your cables.

I also installed resistor to my car, so now, I have no longer the turn signal that flashes very fast on the Dash.
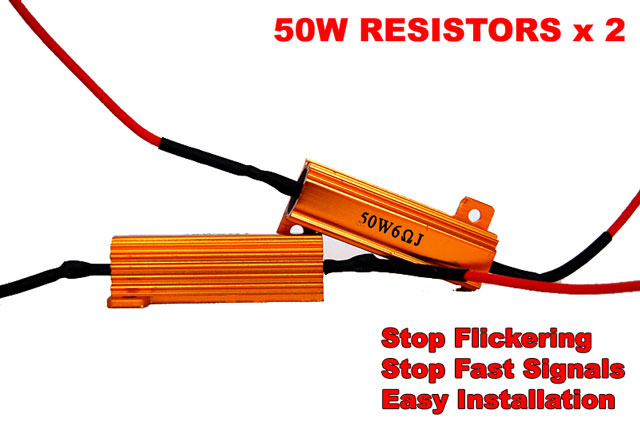
That's how to plug your resistor for the turn signal, very easy.

And after a long night, the finished view is just amazing !!!
:cheers: :cheers: :cheers:


Difference between D8S and D3S in a night shot :
D8S left, D3S right :

Same here, D8S left, D3S right :

Some videos :
- tri-bar + sequential turn in action
[ame]
- The Blue color of the CBI's :
[ame]
Cheers
:cheers:Sponsored
Last edited: