Sponsored

How To Install Universal Splash Guards - Front Fenders.

StangIt #1

POWERED BY Coffee
Joined
Feb 26, 2015
Threads
4
Messages
86
Reaction score
15
Location
The Mountains
Vehicle(s)
S550/SN95 GT's
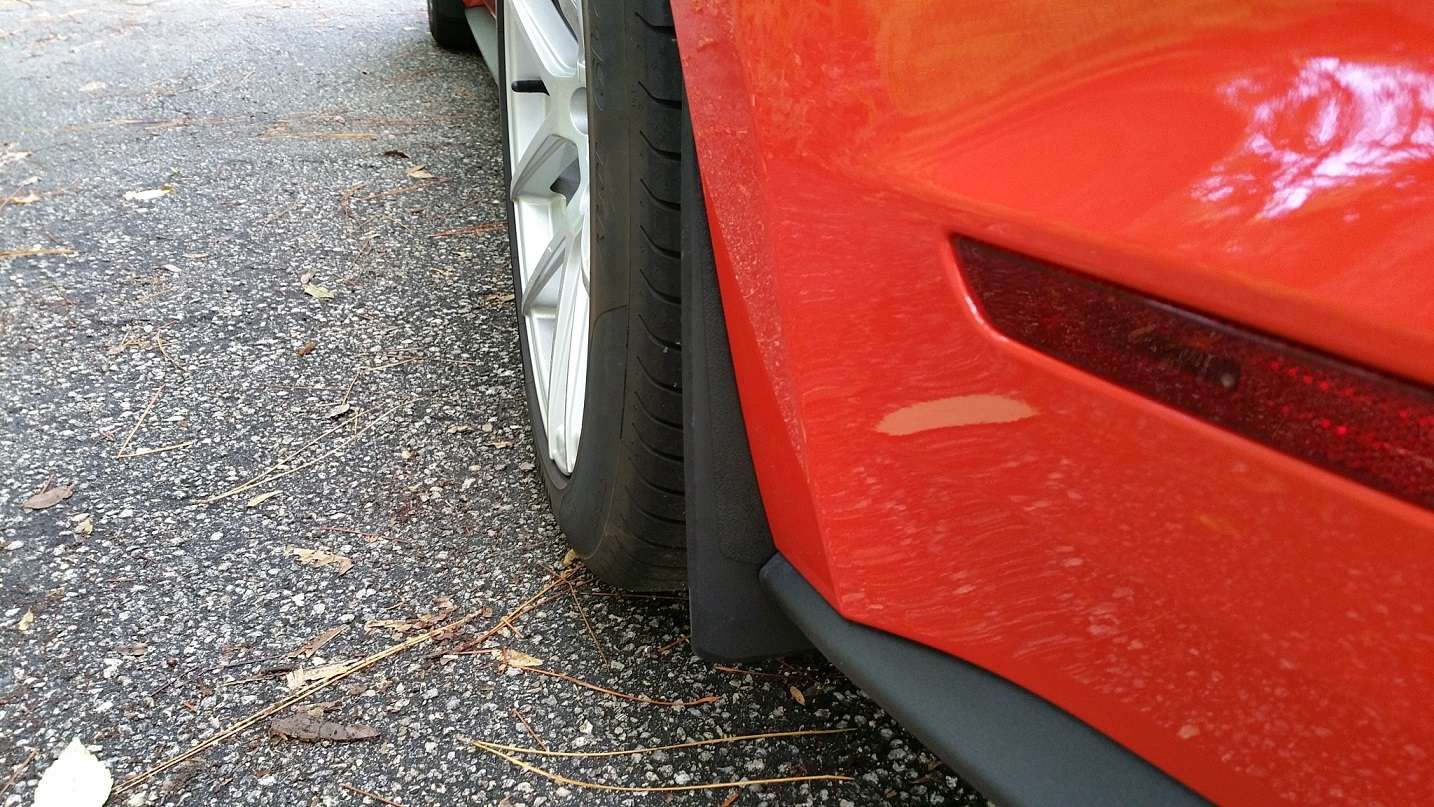
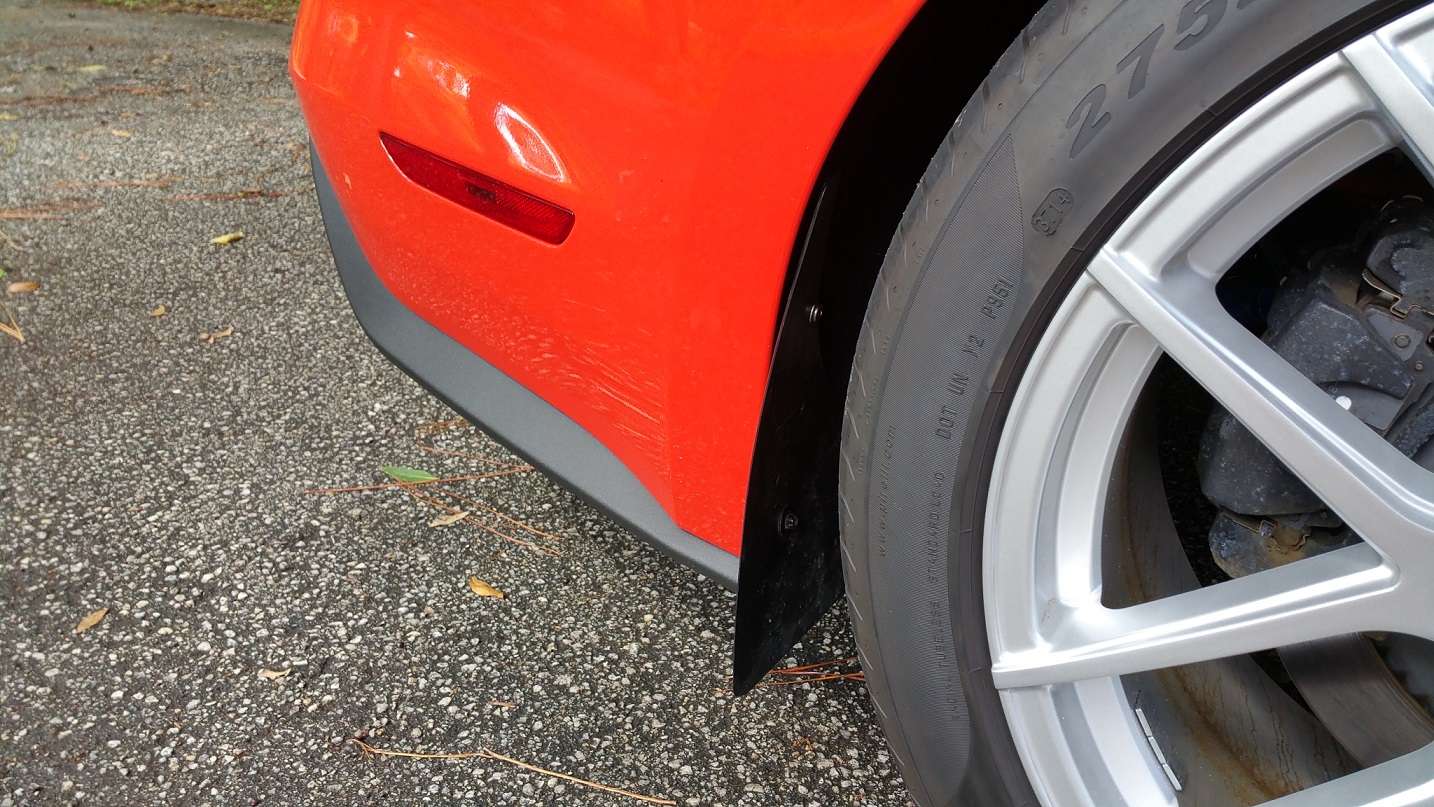
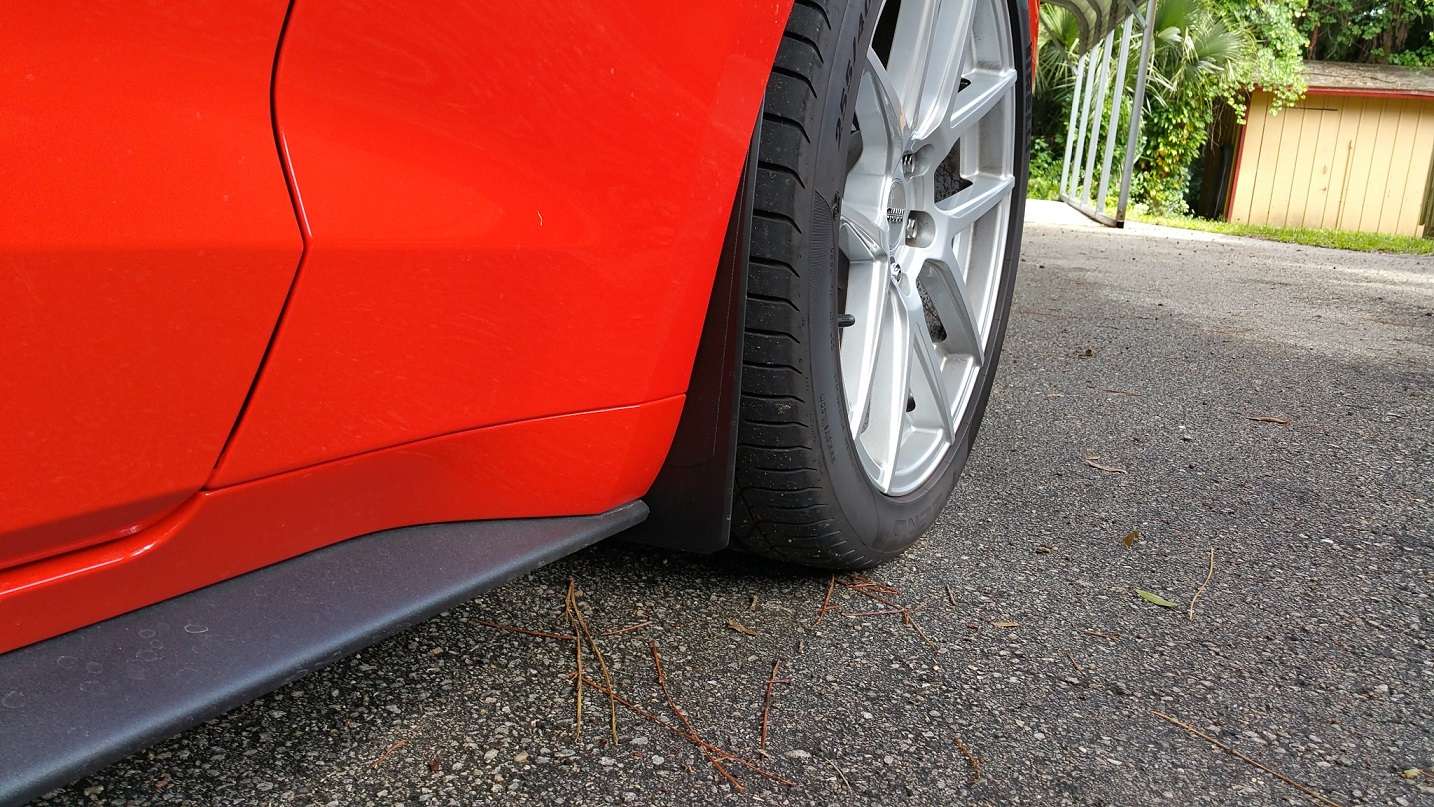
After seeing impact damage on the front flares of the rear quarter panels from rocks flinging off the Pirelli P-Zero tires on my Performance Package GT with less than 1000 miles on the odometer, I decided to fit universal splash guards to the front fenders rather than having an invisible guard installed on the rear quarters. The splash guards were much less expensive, and I honestly don't think they look too bad. It took around an hour to take measurements, to drill the holes (had an "oops" moment that required a slight modification to one hole on each guard), and to do the installation. Here is a list of what I used:

MATERIALS -

Qty. 1, sheet of copier paper

Qty. 2, RoadSport Premier Fit Splash Guards, Size "A," Part #4406 (around $7 from O'Reilly Auto Parts)

Qty. 4, Dorman Auto Grade 5/16" Body Panel Retainers, Part #464340BP ($2.50 from O'Reilly Auto Parts)

2 strips, 3M Auto Advanced Super Strength Molding Tape, Part #03609 (already had it)

1 alcohol swab

TOOLS -

1 large and 1 small flathead screwdriver

1 23/64 drill bit and power drill


Here's how I did it (repeat process for each side):

1. Trace splash guard template on copier paper.
2. Wet the heads of the 3 fender well liner retainers, then fit the template where you want it in the fender well. Press the template against the fender well liner, and it will make three spots on the template showing you where to make the marks for the holes on the splash guards.
3. Lay your template over the splash guards and make the marks for your holes. Drill the holes.
4. Remove the 3 fender well liner retainers (1 small and 2 large) with the flathead screwdrivers. You will only reuse the small retainer (the top one of the 3).
5. Wipe down the painted fender well lip and the side of the splash guard that will be against the fender with the alcohol swab and let them dry.
6. Install a strip of the 3M Molding Tape on the painted portion of the fender well lip to your preferred length, to keep the top portion of the splash guard curved against the fender.
7. Install the splash guard, using the new Dorman retainers for the bottom two holes and the small factory retainer for the top hole.
8. Enjoy less rock damage to the fronts of your rear fender flares.


I bought two sets in the hopes of fashioning the second to the rears, so if you have any suggestions for fitment without any permanent alteration (like drilling the fender well liner), I would love to hear it!
20150408_181740_resized.jpg
20150408_181720_resized.jpg
Sponsored

 
Last edited:

ridenfish39

Well-Known Member
Joined
Feb 25, 2015
Threads
12
Messages
407
Reaction score
138
Location
Philthydelphia
Vehicle(s)
2015 Guard GT PP
This looks great. Thanks for the write up! I have the ''A'' flap in my cart but it doesn't match up with the part number you provided. Is this it?


http://www.oreillyauto.com/site/c/detail/POW2/4406.oap


I take it they are universal and there is no left or right, you just flip them over? If this is the right one I am going to order 4 and try and make the back work as well.
 

2Cool

Well-Known Member
Joined
Nov 4, 2014
Threads
16
Messages
606
Reaction score
257
Location
Melbourne, FL
First Name
Ian
Vehicle(s)
2015 Mustang GT Premium, PP in CO
Nice job! I am stopping by Autozone tonight to grab some parts to try this myself.
 

2Cool

Well-Known Member
Joined
Nov 4, 2014
Threads
16
Messages
606
Reaction score
257
Location
Melbourne, FL
First Name
Ian
Vehicle(s)
2015 Mustang GT Premium, PP in CO
Ok, these went on easy. I went a little more down and in than yours, the decorative line on the back on mine is level with the bottom of the rocker panel, leaving roughly 2" of the flap below the rocker itself. I also used one of the black sheetmetal screws that came with them through the top of the flap into the fender liner to pull it flush, no 3m tape. Roughly 2" down from the top centered.

I am happy with them, will hold me over till molded ones come out. Will get another pair to play with on the back of the car. Likely use some spacers and long bolts/washers/nut to attach to the fabric-like wheelwell liner.
 
OP
OP
StangIt #1

StangIt #1

POWERED BY Coffee
Joined
Feb 26, 2015
Threads
4
Messages
86
Reaction score
15
Location
The Mountains
Vehicle(s)
S550/SN95 GT's
This looks great. Thanks for the write up! I have the ''A'' flap in my cart but it doesn't match up with the part number you provided. Is this it?


http://www.oreillyauto.com/site/c/detail/POW2/4406.oap


I take it they are universal and there is no left or right, you just flip them over? If this is the right one I am going to order 4 and try and make the back work as well.
Ridenfish, the link you posted wasn't working for me, but the actual part number is "4406." I checked it against their website:

http://www.oreillyauto.com/site/c/d...ck=Brand+Search_POW_-1_-1&mn=Powerflow&mc=POW

The package comes with 2 and they are NOT truly universal...there is a left and right side and it will be obvious which is which.
 

Sponsored

OP
OP
StangIt #1

StangIt #1

POWERED BY Coffee
Joined
Feb 26, 2015
Threads
4
Messages
86
Reaction score
15
Location
The Mountains
Vehicle(s)
S550/SN95 GT's
Ok, these went on easy. I went a little more down and in than yours, the decorative line on the back on mine is level with the bottom of the rocker panel, leaving roughly 2" of the flap below the rocker itself. I also used one of the black sheetmetal screws that came with them through the top of the flap into the fender liner to pull it flush, no 3m tape. Roughly 2" down from the top centered.

I am happy with them, will hold me over till molded ones come out. Will get another pair to play with on the back of the car. Likely use some spacers and long bolts/washers/nut to attach to the fabric-like wheelwell liner.
2Cool, can you post up some pics of where you mounted them, as well as if having the guards set lower toward the ground has eliminated the rock flinging? My placement was based on comparing against photos of the "custom" guards on 2010 - 2014 Mustangs, and these universal ones have done what I consider a "very good" job of minimizing the rash. There are still some small stones getting past the guards. It has been so rainy and nasty that I haven't been able to wash up the car to see where debris is actually impacting since the guard installation, so I'm wondering if lower placement is needed.

Also, if you are able to get a set of these on the rears, I would love it if you can provide details on the types/sizes of spacers, bolts, washers, etc., you use, and if you are able to fit them using existing holes (I think there are 3 on the rear).
 

2Cool

Well-Known Member
Joined
Nov 4, 2014
Threads
16
Messages
606
Reaction score
257
Location
Melbourne, FL
First Name
Ian
Vehicle(s)
2015 Mustang GT Premium, PP in CO
Ok, got the backs on, they came out ok but likely I will be tweaking them a bit. Also redid the fronts to move them up and out a bit. I have the MMD 19x8.5" 35mm offset wheels up front... and 20mm spacers to flush them to the fenders. Definitely needed more coverage.

So the backs I used only two bolts with nuts/washers on each side and a bit of loctite. Drilled through the fabric like liner and bolted them on:


Fronts I mirrored the OP's install, but used the black sheetmetal screws that come with the flaps to put one on each side near the top to pull them in to match the fender curve, no tape:


ridenfish39

Well-Known Member
Joined
Feb 25, 2015
Threads
12
Messages
407
Reaction score
138
Location
Philthydelphia
Vehicle(s)
2015 Guard GT PP
I did the front yesterday. Now I can drive without cringing when I hear gravel going up in my wheel wells. Now to do the back......
 

daytripper

Well-Known Member
Joined
Feb 23, 2015
Threads
11
Messages
328
Reaction score
47
Location
E.TN
Vehicle(s)
'13GT500,'15 GT
Thanx for posting all this info. I am off to O'Reillys to get the parts and will install soon.
 

RIBS

Well-Known Member
Joined
Feb 20, 2015
Threads
45
Messages
775
Reaction score
297
Location
Metro Atlanta
First Name
Steve
Vehicle(s)
2015 Mustang GT Ruby Red
I did a very similar install today on mine. I cannot find the A size in my town so I bought B size and they are the exact width of my tires . So I modified the install plan a little bit. I used black RTV to glue thin strips of a bicycle inner tube to my fender so the guards won't rub on the paint. Also I could not find The correct fasteners so I found some 5/16 plastic drywall anchors and tapped them in the bottom two holes in front. I have to remount the fronts in further and level them and add a few spacers to level them out and paint the stainless steel screw heads and I'll be done.
image.jpg
 

Sponsored
OP
OP
StangIt #1

StangIt #1

POWERED BY Coffee
Joined
Feb 26, 2015
Threads
4
Messages
86
Reaction score
15
Location
The Mountains
Vehicle(s)
S550/SN95 GT's
I did a very similar install today on mine. I cannot find the A size in my town so I bought B size and they are the exact width of my tires . So I modified the install plan a little bit. I used black RTV to glue thin strips of a bicycle inner tube to my fender so the guards won't rub on the paint. Also I could not find The correct fasteners so I found some 5/16 plastic drywall anchors and tapped them in the bottom two holes in front. I have to remount the fronts in further and level them and add a few spacers to level them out and paint the stainless steel screw heads and I'll be done.
Looks good, RIBS!

Would anyone car to share the length of bolts and approximate size of the washers you used to attach the rear guards to the felt liner? It would be a relatively simple measurement, but I figure someone posting it, here, may make things simpler for anyone else looking to put the parts lists together before hitting the parts store.
 

RIBS

Well-Known Member
Joined
Feb 20, 2015
Threads
45
Messages
775
Reaction score
297
Location
Metro Atlanta
First Name
Steve
Vehicle(s)
2015 Mustang GT Ruby Red
Looks good, RIBS!

Would anyone car to share the length of bolts and approximate size of the washers you used to attach the rear guards to the felt liner? It would be a relatively simple measurement, but I figure someone posting it, here, may make things simpler for anyone else looking to put the parts lists together before hitting the parts store.
I used stainless steel nuts bolts and screws...I need to make some spacers to align the fit a little better. I had 4 inch stainless bolts,I had to cut them down to about 3.5. The 3 inch bolts were too short. If you look in the rear well, close to the rear bumper cover portion, you will see a deep valley with 2 plastic trim retainers... I removed those and used them for my bolts...so I actually went through the fender liner and done a hard mount places on a bumper cover bracket..... I also sank a screw through the splash guard, into the carpet like backing to adjust the angles of the guard....that screw can be short, like a half inch.....also reused the lower inboard trim retainer. My problem right now is I have the splash guard on the fabric liner, and the bumper cover, with the 3.5 inch screws holding the outside an top edges... That allows the top of the splash gars to slide around, without spacers, the splashgard just deforms when you tighten down too far....and yes I need to paint the screw heads too!!

I used the rears as is from the auto parts store, the fronts I trimmed down some because it was duplicating the inner liner and causing a pocket to catch mud...so I trimmed the upper and midrange inside of the guard.
image.jpg
 
Last edited:

RIBS

Well-Known Member
Joined
Feb 20, 2015
Threads
45
Messages
775
Reaction score
297
Location
Metro Atlanta
First Name
Steve
Vehicle(s)
2015 Mustang GT Ruby Red
Rear screws an retainers...to be refined!
image.jpg
 

Niz55

Well-Known Member
Joined
May 10, 2015
Threads
358
Messages
3,674
Reaction score
1,281
Location
Us
Vehicle(s)
17 GT350
Good diy. American muscle has the front and rear. They are stupid expensive.
Sponsored


Top