GreenS550
Well-Known Member
- Joined
- Nov 18, 2017
- Threads
- 126
- Messages
- 2,317
- Reaction score
- 1,601
- Location
- Houghton, MI 49931 Oakland, MI 48363
- First Name
- Bob
- Vehicle(s)
- 2019 Mustang GT Premium 2020 Explorer Limited
- Thread starter
- #1
I was messing around this morning and clicked the link about my car. One link says it's scheduled for production May 3rd and another says waiting for production date.
So I continued to the next page and entered the VIN and I was able to access the owners manual. Very cool.
Under Mach I track use it says: "
TRACK USE - MACH 1
Operating at High Speeds and Track Days
Your vehicle is capable of sustained high speeds and track day driving.
Before operating your vehicle at high speeds:
Track Apps
This information display driven feature provides a suite of menu options to record and optimize your track performances. See General Information.
Note: Track Apps are for track use only. Do not use them under any other driving conditions.
Note: You cannot view or clear your results unless your vehicle is at a complete stop with the right arrow on the display menu inactive. If your vehicle does not reach 100 mph (160 km/h) during the track run, your display may not show your selected interval's results.
Note: The pre-collision assist system turns off when using Track Apps or when you switch off your stability control system.
Acceleration Timer
Displays your vehicle's rate of acceleration for a given speed or distance range.
Accelerometer
Displays your vehicle's rate of acceleration or deceleration. A dot moves toward the area of acceleration or deceleration.
LEFT Acceleration or Deceleration
When accelerating or decelerating left, the dot moves to the right on the accelerometer.
RIGHT Acceleration or Deceleration
When accelerating or decelerating right, the dot moves to the left on the accelerometer.
Brake Performance
Displays your vehicle's rate of deceleration for a given speed range.
Exhaust Mode
Gives the driver the ability to choose the vehicle's exhaust mode.
Note: The Track Exhaust Mode setting is only for use at tracks and not for use on public roadways. Use of this setting results in increased exterior noise, which may not meet state and local laws and regulations. It is the obligation of the driver to operate the vehicle in a manner that complies with state and local requirements. Only use the Track Exhaust Mode setting at a competition track or an off-road course where elevated exterior vehicle noise is acceptable.
Lap Timer
Gives you the ability to record lap times at three separate tracks.
Launch Control
Maximizes your vehicle's traction from a standing start.
Follow these steps to use launch control:
Line lock is a feature intended for use at tracks only and should not be used on public roadways. Use of this feature may result in significantly increased rear tire wear. It is intended to condition the rear tires to maximize traction prior to track use. Line lock maintains brake force at the front wheels, allowing the rear wheels to spin with minimal vehicle movement.
This feature is located in the Track Apps menu. Make selections through the 5-way information display control and OK button located on the steering wheel.
Using Line Lock
There are three line lock stages:
The initiation stage verifies that the vehicle is ready for line lock function, and confirms driver intent. Follow the prompts in the information display to initiate line lock.
The following conditions must be met to initialize line lock:
Engaging Line Lock
Follow the prompts in the information display to engage line lock after it is initialized. To engage, firmly apply the brakes. Then press the OK button. Once engaged, release the brake pedal. The front brakes remain applied and the rear brakes release. At this point, the engagement timer is initiated and shown on the driver information display.
The following conditions must be met to engage line lock:
While line lock is engaged, you can exit (release) the feature using the OK button. When you press the OK button, line lock releases immediately and normal vehicle function resumes. When line lock engages, a countdown timer shows the remaining time before line lock is released automatically. If you exceed the time limit, or another vehicle condition requires line lock to release, the system safely disengages and normal vehicle function resumes.
Note: If you apply the brake pedal while line lock is engaged, line lock automatically cancels and normal brake function resumes.
Performance Shift Indicator
The performance shift indicator displays a row of colored lights that represent engine RPM.
The performance shift indicator menu allows you to:
Allows you to select the type of countdown the information display shows before starting an event.
Status Screen
Provides the status of your chosen performance-related settings.
View/Clear Results
Allows you to view and clear the last and saved results of the Acceleration Timer, Brake Performance, and All Time Best results.
Road Course Alignment Recommendations
Note: After your track day is complete, return your car to the street alignment and tire pressures.
Note: Using these wheel alignment settings may cause excessive tire wear. Only use these settings for racing or competitive driving. Excessive tire wear is not covered under the vehicle warranty.
If you plan to participate in road course track days, we recommend the following chassis settings for optimal tire wear and handling performance.
All settings are at curb loading condition full of fuel.
Mach 1
Mach 1 with Handling Package
Track Tire Pressures
Cold Tire Pressures
Hot Tire Pressures
Track Use Maintenance Intervals
Follow these maintenance intervals for when you use your vehicle on a track or in a high-speed event.
1Change the fluid every 500 mi (800 km) or when a message appears in the information display stating that the axle fluid is over temperature.
Adjustable Camber Front Strut Top Mounts (vehicles with Optional Handling Package)
Your vehicle has adjustable strut mounts which you can use to adjust the camber of your vehicle before and after a track event to the specifications listed in the Road Course Alignment Recommendations table previously shown.
Note: After your track day is complete, return your car to the street alignment and tire pressures.

Note: The adjustable camber front strut mounts are fitted with three set screws that must be removed before camber can be adjusted. If you cannot adjust the camber, please see your authorized dealer or call 800–367–3788 for more details to remove the set screws.
Aerodynamics
Rear Gurney Flap
The rear Gurney flap must be removed for on-road driving.
Your vehicle may include a removable Gurney flap in the luggage compartment. The Gurney flap greatly enhances high speed stability and performance on the track. It is recommended that you use the Gurney flap at all tracks featuring high speed corners and can be used at any track regardless of cornering speeds.
You could benefit from the removal Gurney flap to improve low speed balance on smaller tracks with maximum cornering speeds below 70 mph (112 km/h). We recommend that you attach the Gurney flap for all track events and carefully assess both the vehicle's condition and your capability before removal.
Note: The Gurney flap comes with longer size bolts to install it onto the rear spoiler. Do not use the longer size bolts without the Gurney flap attached or damage to the spoiler may occur.
Brake Burnishing
The brakes should be properly burnished prior to heavy track use. Excessive brake noise may occur after the track burnish or track use. Perform this procedure in a safe manner on dry pavement, and in compliance with all local and state ordinances and laws regarding motor vehicle operation.
How to Burnish the Brakes
Initial low temperature bedding:
So I continued to the next page and entered the VIN and I was able to access the owners manual. Very cool.
Under Mach I track use it says: "
TRACK USE - MACH 1
Operating at High Speeds and Track Days
Your vehicle is capable of sustained high speeds and track day driving.
Before operating your vehicle at high speeds:
- Verify your tires have the correct pressures.
- Inspect wheels and tires for wear and damage. Replace any damaged wheels and tires.
- Check and set lug nut torque. See Technical Specifications.
- Verify fluid levels for oil, coolant, brake and hydraulic fluid. See Capacities and Specifications.
- Change the engine oil and replace the engine oil filter prior to use on the track. Change the engine oil and filter again after every four hours of track time. Maintain the engine oil level at or near the max mark on the engine oil dipstick. See Engine Oil Check.
- Replace the brake fluid with fresh Motorcraft/Ford DOT 4 LV High Performance Brake Fluid or other DOT compliant fluid with a dry boiling point greater than 500°F (260°C) from a sealed container. Do not use silicone or DOT 5 brake fluids.
- If you are operating your Mach 1 on a drag strip, use drag strip selectable drive mode in addition to using line lock and launch control to provide a specific set-up tuned for the quickest straight line elapsed times.
- If you are operating your Mach 1 on a road course, use sport or track selectable drive modes to provide a specific set-up tuned for optimal shift and suspension set-up that is tuned towards handling prowess on closed course surfaces.
- Set the tire pressure to the proper specification.
- Check and set the lug nut torque. See Technical Specifications.
- Check all fluid levels.
- Refer to the track maintenance interval chart. See Normal Scheduled Maintenance.
- Check the front and rear wheel bearings for abnormal wear.
- Inspect brake caliper dust boots for abnormal wear.
Track Apps

|
Note: Track Apps are for track use only. Do not use them under any other driving conditions.
Note: You cannot view or clear your results unless your vehicle is at a complete stop with the right arrow on the display menu inactive. If your vehicle does not reach 100 mph (160 km/h) during the track run, your display may not show your selected interval's results.
Note: The pre-collision assist system turns off when using Track Apps or when you switch off your stability control system.
Acceleration Timer
Displays your vehicle's rate of acceleration for a given speed or distance range.
Accelerometer
Displays your vehicle's rate of acceleration or deceleration. A dot moves toward the area of acceleration or deceleration.
LEFT Acceleration or Deceleration
When accelerating or decelerating left, the dot moves to the right on the accelerometer.
RIGHT Acceleration or Deceleration
When accelerating or decelerating right, the dot moves to the left on the accelerometer.
Brake Performance
Displays your vehicle's rate of deceleration for a given speed range.
Exhaust Mode
Gives the driver the ability to choose the vehicle's exhaust mode.
Note: The Track Exhaust Mode setting is only for use at tracks and not for use on public roadways. Use of this setting results in increased exterior noise, which may not meet state and local laws and regulations. It is the obligation of the driver to operate the vehicle in a manner that complies with state and local requirements. Only use the Track Exhaust Mode setting at a competition track or an off-road course where elevated exterior vehicle noise is acceptable.
Lap Timer
Gives you the ability to record lap times at three separate tracks.
Launch Control
Maximizes your vehicle's traction from a standing start.
Follow these steps to use launch control:
- Bring your vehicle to a complete stop.
- Make sure launch control is enabled. The indicator illuminates in the information display when launch control is enabled. See Warning Lamps and Indicators.
- Fully press the clutch pedal.
- Shift the transmission into 1st gear.
- Fully depress the accelerator pedal and allow the engine RPM to stabilize.
- Release the clutch pedal.
Line lock is a feature intended for use at tracks only and should not be used on public roadways. Use of this feature may result in significantly increased rear tire wear. It is intended to condition the rear tires to maximize traction prior to track use. Line lock maintains brake force at the front wheels, allowing the rear wheels to spin with minimal vehicle movement.
This feature is located in the Track Apps menu. Make selections through the 5-way information display control and OK button located on the steering wheel.
Using Line Lock
There are three line lock stages:
- Initiated.
- Engaged.
- Off.
The initiation stage verifies that the vehicle is ready for line lock function, and confirms driver intent. Follow the prompts in the information display to initiate line lock.
The following conditions must be met to initialize line lock:
- The vehicle is on a level surface.
- The engine is running.
- The vehicle is traveling less than 25 mph (40 km/h).
- Selectable drive mode is not in wet mode (if equipped).
- There are no electronic stability control faults.
Engaging Line Lock
Follow the prompts in the information display to engage line lock after it is initialized. To engage, firmly apply the brakes. Then press the OK button. Once engaged, release the brake pedal. The front brakes remain applied and the rear brakes release. At this point, the engagement timer is initiated and shown on the driver information display.
The following conditions must be met to engage line lock:
- The vehicle is on a level surface.
- The engine is running.
- The vehicle is stopped.
- The parking brake is not applied.
- The driver door is closed.
- The transmission is in a forward gear.
- Selectable drive mode is not in wet mode (if equipped).
- There are no electronic stability control faults.
- The steering wheel must be in the straight ahead position.
While line lock is engaged, you can exit (release) the feature using the OK button. When you press the OK button, line lock releases immediately and normal vehicle function resumes. When line lock engages, a countdown timer shows the remaining time before line lock is released automatically. If you exceed the time limit, or another vehicle condition requires line lock to release, the system safely disengages and normal vehicle function resumes.
Note: If you apply the brake pedal while line lock is engaged, line lock automatically cancels and normal brake function resumes.
Performance Shift Indicator
The performance shift indicator displays a row of colored lights that represent engine RPM.
The performance shift indicator menu allows you to:
- Choose whether the indicator is shown on the windshield or information display.
- Set a shift point within the allowable RPM range in increments of 100.
- Enable or disable the associated shift tone, based on the set shift point.
- Set the between off, change with drive mode, tach, track and drag.
- Set the light intensity. The intensity adjusts between day time and night time.
Allows you to select the type of countdown the information display shows before starting an event.
Status Screen
Provides the status of your chosen performance-related settings.
View/Clear Results
Allows you to view and clear the last and saved results of the Acceleration Timer, Brake Performance, and All Time Best results.
Road Course Alignment Recommendations
Note: After your track day is complete, return your car to the street alignment and tire pressures.
Note: Using these wheel alignment settings may cause excessive tire wear. Only use these settings for racing or competitive driving. Excessive tire wear is not covered under the vehicle warranty.
If you plan to participate in road course track days, we recommend the following chassis settings for optimal tire wear and handling performance.
All settings are at curb loading condition full of fuel.
Mach 1
| Front | Track | Street |
|---|---|---|
| Camber | -1.5° | -1.03° |
| Toe - Total | ° | ° |
| Rear | Track | Street |
|---|---|---|
| Camber | -1.5° | -1.5° |
| Toe - Total | .24° | .24° |
| Front | Track | Street |
|---|---|---|
| Camber | -2.25° | -1.21° |
| Toe - Total | .1° | .1° |
| Rear | Track | Street |
|---|---|---|
| Camber | -1.5° | -1.14° |
| Toe - Total | .3° | .3° |
Cold Tire Pressures
| Tire Pressure | Front | Rear |
|---|---|---|
| Mach 1 | 30 psi (2.07 bar) | 30 psi (2.07 bar) |
| Mach 1 with Handling Package | 28 psi (1.93 bar) | 28 psi (1.93 bar) |
| Tire Pressure | Front | Rear |
|---|---|---|
| Mach 1 | Less than 38 psi (2.62 bar) | Less than 38 psi (2.62 bar) |
| Mach 1 with Handling Package | Less than 36 psi (2.48 bar) | Less than 36 psi (2.48 bar) |
Follow these maintenance intervals for when you use your vehicle on a track or in a high-speed event.
| Interval | Vehicle Use and Example |
|---|---|
| One track weekend or approximately 4 hours of track use | Change the engine oil and filter |
| Every 500 mi (800 km) | Change the rear axle fluid1 |
Adjustable Camber Front Strut Top Mounts (vehicles with Optional Handling Package)
Your vehicle has adjustable strut mounts which you can use to adjust the camber of your vehicle before and after a track event to the specifications listed in the Road Course Alignment Recommendations table previously shown.
Note: After your track day is complete, return your car to the street alignment and tire pressures.
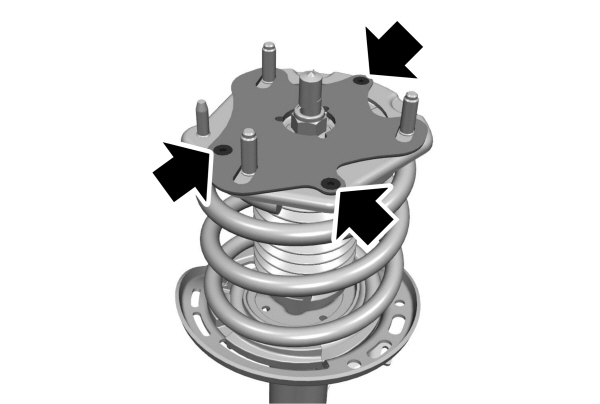
Note: The adjustable camber front strut mounts are fitted with three set screws that must be removed before camber can be adjusted. If you cannot adjust the camber, please see your authorized dealer or call 800–367–3788 for more details to remove the set screws.
Aerodynamics
Rear Gurney Flap

The rear Gurney flap must be removed for on-road driving.
Your vehicle may include a removable Gurney flap in the luggage compartment. The Gurney flap greatly enhances high speed stability and performance on the track. It is recommended that you use the Gurney flap at all tracks featuring high speed corners and can be used at any track regardless of cornering speeds.
You could benefit from the removal Gurney flap to improve low speed balance on smaller tracks with maximum cornering speeds below 70 mph (112 km/h). We recommend that you attach the Gurney flap for all track events and carefully assess both the vehicle's condition and your capability before removal.

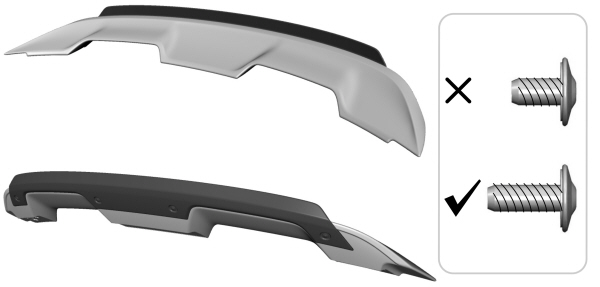
Note: The Gurney flap comes with longer size bolts to install it onto the rear spoiler. Do not use the longer size bolts without the Gurney flap attached or damage to the spoiler may occur.
Brake Burnishing
The brakes should be properly burnished prior to heavy track use. Excessive brake noise may occur after the track burnish or track use. Perform this procedure in a safe manner on dry pavement, and in compliance with all local and state ordinances and laws regarding motor vehicle operation.
How to Burnish the Brakes
Initial low temperature bedding:
- If your brakes already have 200 mi (322 km) or more of city driving, skip this step and go directly to the high temperature bedding cycle procedure. Otherwise, perform at least 30 stops from 50 mph (80 km/h) at 1/3 g deceleration with 1 mi (1.2 km) spacing between stops. A deceleration gauge can be accessed through the TrackApps menu in your information display.
- Beginning with cool brakes, perform 15 consecutive stops back to back, accelerating at 3/4 throttle to 80 mph (128 km/h) and braking to 20 mph (32 km/h) at 1.0 g deceleration. The brakes may omit an odor or smoke during this part of the procedure.
- Cool the brakes down by driving one or two laps, 5 mi (8 km), at 60 mph (96 km/h) with minimal to no brake usage.
- Perform at least 30 stops from 50 mph (80 km/h) at 1/3 g deceleration with 0.7 mi (1.2 km) spacing between stops. A deceleration gauge can be accessed through the TrackApps menu in your information display.
Sponsored
