Sponsored

***RTR LED Accent Vent Lights Install Write-up***

Project Whitemare

GTFO Squad
Joined
Nov 12, 2014
Threads
43
Messages
1,309
Reaction score
1,011
Location
Bay Area
Website
www.instagram.com
First Name
Nick
Vehicle(s)
2015 Mustang GT/PP
ford-mustang-american-muscle-logo_zps8065c96a.png

RTRLEDAccentVentLights.jpg


Click Below to Buy Exclusively from American Muscle:
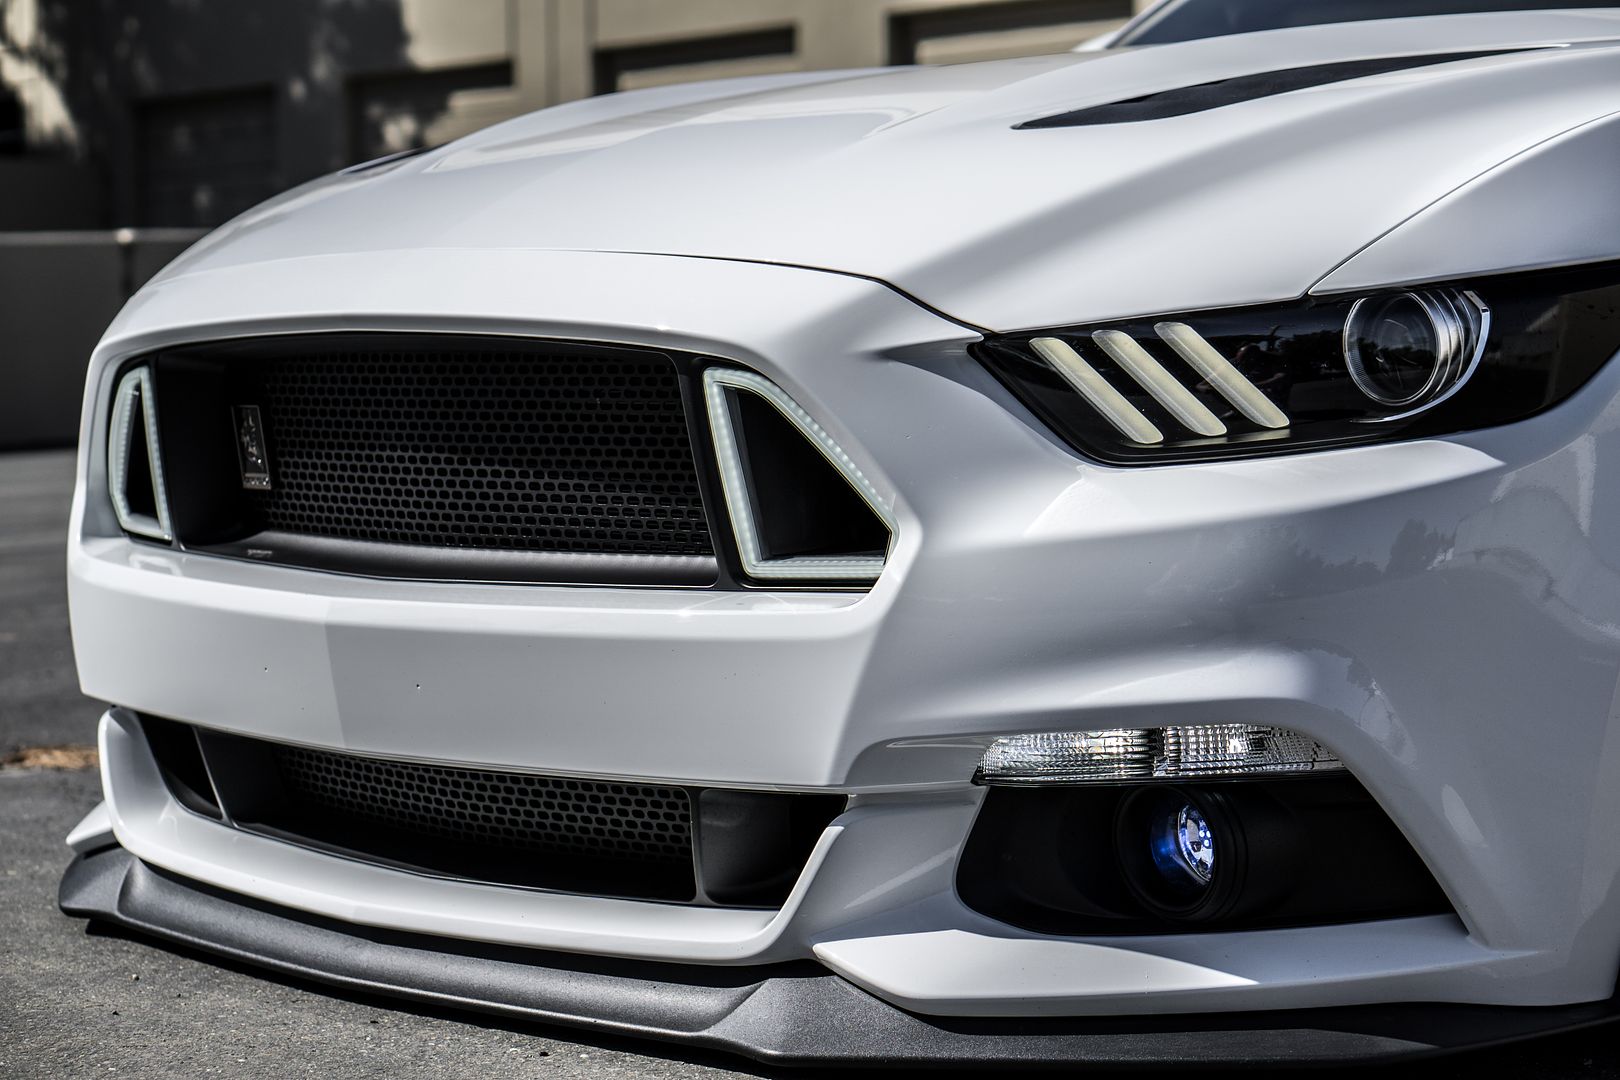
RTR Grilles w/ Accent Vent Lights

Disclaimer:
The RTR Accent Vent Lights are designed to work exclusively with the RTR Upper Grille.

Tools Needed:
5.5mm Socket
7mm Socket
8mm Socket
13/64 Drill Bit
1/4" Drive Ratchet
Panel Removal Tool
Flat Head Screw Driver
Drill
Blanket
Optional: nut drivers, punch, 1/32 drill bit, 3/16 drill bit


Difficulty Level:
2 out of 12 Beers

Parts List:
RTR LED Accent Vent Lights
(6) Phillips Screws
(6) Lock Washers
(4) Wire Taps (not needed when installed as intended)


Preparation:
Raise the vehicle from the front and place on jackstands.

Video:

>>>Coming Soon<<<

Installation:


With the front of the vehicle on jackstands, pull out the RTR LED Accent Vent Lights and inspect your parts.

Remove the front wheels.


EFD76098-57D2-4E4C-9CD6-C19446439F7E.jpg


Raise the hood and prepare to remove the radiator cover.


4BEA3795-3318-42DA-B87E-FBBA53CC75C9.jpg


Remove the (8) retaining clips that hold the radiator cover.


EC0B2B03-F105-411F-8DAD-3EEA5EAAAA6B.jpg


Using the right tools for the job will always speed up the install process.


9D8CA5C1-CBB7-4297-9AFC-6993626CA6DA.jpg


Remove the radiator cover and set it aside.


Locate and remove the (6) 8mm screws that run across the front of the shroud.


B6F7905B-C484-49FC-B71A-F97C477A705B.jpg


Pull back the stripping near the headlight to expose and remove these little 5.5mm buggers.


E47843F7-1CEA-4303-A95A-8E4ABD3508EA.jpg


CD79E823-58C5-482F-8965-1594370482E3.jpg


A2876ADC-EA17-4130-A9CD-8757F19DD5B8.jpg


Head underneath and remove the retaining clips that hold the front of the wheel well liner on.


1FF3828B-D441-434D-9C47-FF1CE30D2665.jpg


C67CB5B1-F814-4869-9224-E6385887140D.jpg


With the retaining clips removed, peal the wheel well liner back to expose the 7mm screw that goes between the fender and the bumper. With the wheel removed, and the liner pulled back, this should be no problem for you.


EBD63D2E-4A75-486D-B791-4821B183E808.jpg


With the 7mm screw removed, set it aside and move beneath the front of the car to disconnect the belly pan.


Remove the (2) recessed 7mm screws in the middle of the belly pan.

FED1B69C-48C1-4C51-96AA-2EE2A409EEEA.jpg


Remove the (4) 7mm screws at the rear of the belly pan.


1EB1EE22-CC35-46EB-9A9E-A2942284E0B7_3.jpg


4A2AB26E-1785-44B5-95A5-B7FFF1D75BBD.jpg


Remove the (3) retaining clips releasing the wheel well liner from the belly pan.


Now you are ready to remove the bumper.


Starting at the sides of the bumper where it meets the fender, grip the bumper and pop the bumper out with a quick pull.


8C3A9590-0F07-4E50-AE77-C6A82B895F21.jpg


Reach up from under the bumper and above the belly pan and disconnect the fog light harnesses and corner marker harnesses. Turn the turn signal bulbs counter clockwise and pull them out to let hang as well.


Head up to the top of the bumper near the shroud and pull the bumper up and off.


5EE8769E-C765-470D-B204-BCE4B70FB27B.jpg


Set the bumper aside.


C5C54FD8-A980-42A8-BD06-2580F4D1D48F.jpg


If you have not previously installed the RTR Grilles, refer to the following thread to see how to swap the grilles out to the RTR Grilles.

http://www.mustang6g.com/forums/showthread.php?t=45608


With the RTR Grilles mounted in the bumper, locate the (3) dimples on each of the outer vents.


182D7813-73B6-4C08-A3B1-34B5FF31F86D.jpg


Using a punch, mark your drilling point.


21DC1C7E-1199-4643-AABA-C167D9A292D4.jpg


The instructions call for a 13/64 drill bit, but the closest I had was a 3/16 and it worked just fine. After using the punch to mark a center mark on the radius towards the rear of the dimple, I used a 1/32 drill bit to drill out some pilot holes.


4013172C-FEA1-4856-A69E-EBC4B701E38B.jpg


After drilling out the pilot holes, I moved up to my 3/16 bit and finished drilling out the holes. Super simple, but this was where the first beer came in handy. Just after the drill comes out.


Although it may not be necessary to use a punch and drill a pilot hole, I will recommend that you do so.


76CF18F9-6961-4C6B-9008-049B54FC8C0B.jpg


Once you have all of the holes drilled out, it's time to finish up.


333E7FD1-6B62-48C8-B203-69E62699AB46.jpg


From the front of the bumper, feed the harness through the vent, and the LED housing will settle beautifully into place.


01BC7FD0-F244-4CAB-940D-164FFACC8B99.jpg


82D77851-A87D-4EFA-BE2E-BC5E8EDC9CD3.jpg


Go ahead and grab your self a victory swig after seeing the LED in the grille for the first time!


With and without:


DF25B8CF-7EEB-461F-802A-4E71EBEA4804.jpg


Using the supplied hardware, mount the LED housing into the grille by using (3) screws and (3) lock washers on either side.


0EC31114-E518-4E8B-A49B-2F18778DB637.jpg


Cut the ziptie off of the harness, and peal back the double sided tape and mount the controller on the back side of the grille.


2141B0F6-64EA-4941-89C8-8034FC1A70E9.jpg


I opted to also zip tie the wires a bit to keep them tucked back as best and neat as possible. Not needed.


Place the bumper in front of the car to finish the install.


12B28314-878D-4280-A2EA-3C80B56A19D6.jpg


Reach up from under the vehicle in front of the wheel wheel liner, and locate the harness going into the back of the headlight. Remove this harness.


DA2751DC-0515-437E-BA61-63A963D11171.jpg


Plug the male end of the RTR LED harness into the back of the headlight, and plug the mail end of the OEM headlight harness into the female side of the RTR LED harness.


Place the bumper back on the vehicle, and test for full functionality before reinstalling all of the previously removed oem hardware.


Finished Product:

26998A0E-D395-47A2-86F5-56F40E67FDC8.jpg


Before and After:

72c2796c-b12a-40b4-aedc-454027cf8604.jpg


FrontEndMadness_1.jpg


RTRLightsFrontEnd.jpg


AlloftheLights.jpg

Sponsored

 
Last edited:

15RRGT

I am teh liquor
Joined
Sep 16, 2015
Threads
4
Messages
540
Reaction score
163
Location
Cleveland
First Name
Tom
Vehicle(s)
2015 RR GT PP TVS
Super cool and awesome write up as usual!
 

Souldriver

Well-Known Member
Joined
Jun 4, 2015
Threads
34
Messages
772
Reaction score
93
Location
NY
Vehicle(s)
2016 - Guard GT Prem. PP
You had the same idea I have, to put the coyote badge up there. It makes it look like a special edition of something. I have the dilemma of doing that or trying to find a way to get the pony back up there
 

AMAlexLazarus

Well-Known Member
Diamond Sponsor
Joined
Sep 29, 2014
Threads
131
Messages
2,587
Reaction score
773
Location
Malvern, PA
Website
www.americanmuscle.com
First Name
Alex
Vehicle(s)
'14 F150 EcoBoost/'08 Bullitt
@Project Whitemare

Excellent work as always. Thanks for taking the time to get a write-up posted over the Holiday!

Alex
 

Sponsored

MixTape

Well-Known Member
Joined
Aug 28, 2014
Threads
12
Messages
184
Reaction score
14
Location
Royal Oak, MI
Vehicle(s)
Guard Green 2015 Ford Mustang EcoBoost PP
Just ordered the lights to install on my EcoBoost, can't wait to complete the look for this grille!
 
OP
OP
Project Whitemare

Project Whitemare

GTFO Squad
Joined
Nov 12, 2014
Threads
43
Messages
1,309
Reaction score
1,011
Location
Bay Area
Website
www.instagram.com
First Name
Nick
Vehicle(s)
2015 Mustang GT/PP
Super cool and awesome write up as usual!
Appreciate that! I have been waiting for these lights for quite some time, as have most of you if you are in this thread!

You had the same idea I have, to put the coyote badge up there. It makes it look like a special edition of something. I have the dilemma of doing that or trying to find a way to get the pony back up there
I have been considering moving the emblem to dead center now that I have the lights. Not sure...

The king of write ups is back :hail:

Looking forward to these when AM gets them back in Stock. :frusty:
Thanks man! That means a lot!

I have been doing this for years now, in hopes of helping the average Joe gain the confidence to try these installs on their own.

I often feel that I'm being long winded with the write-ups, but I try to make sure to cover more than just what's on the instructions.

Good luck snagging a set as soon as they get in stock! You are going to love them! My new favorite mod!

@Project Whitemare

Excellent work as always. Thanks for taking the time to get a write-up posted over the Holiday!

Alex
No problem brother! Always a pleasure to work with you guys!

These bad boys are sick!! Love them!

Just ordered the lights to install on my EcoBoost, can't wait to complete the look for this grille!
Yup! They will be some of the best fitting parts you've ever received!

Looks killer.
:cheers:

Looks great, thanks for the write up!
No problem! Hope you get a chance to get a set!


Joined
Mar 24, 2016
Threads
21
Messages
1,078
Reaction score
394
Location
GA
Vehicle(s)
2016 Mustang GT
Great write up!

Two things that I struggled with.

1. Was getting frustrated because driver side headlight connection wouldn't reach. Got under the car and gave it a slight tug and realized it was caught on something. Crisis averted.

2. When you have it mostly buttoned back up and admiring your work...make sure you put the damn crash beam back on first...

BRB tearing it apart again :)

BTW, I mounted the harness as shown in the instructions. In retrospect, probably not a good idea as it looks like the harness only had contact on the edges and not in the middle. Guess I'll know if the harness falls off.
 
Last edited:

Sponsored

lizardrko

Well-Known Member
Joined
Jul 22, 2016
Threads
32
Messages
559
Reaction score
212
Location
Bay Area, CA
Vehicle(s)
2016 Mustang EB Auto PP
HELP! The LEDconnectors do not fit into my headlight harness! It is like they are a different size
 

moto111

Well-Known Member
Joined
Mar 12, 2015
Threads
57
Messages
1,262
Reaction score
295
Location
Illinois
Vehicle(s)
2015 mustang gt
i hate the 7mm screw holding bumper on by the clips literally hate it such a dumb place to put it
 

lizardrko

Well-Known Member
Joined
Jul 22, 2016
Threads
32
Messages
559
Reaction score
212
Location
Bay Area, CA
Vehicle(s)
2016 Mustang EB Auto PP
Just kidding, we were being dumb and not looking at the right connectors. We were looking at the driving lights not the headlights. Its installed and looks awesome. The LEDs are brighter than I thought.
 
Joined
Mar 24, 2016
Threads
21
Messages
1,078
Reaction score
394
Location
GA
Vehicle(s)
2016 Mustang GT
Great write up!

Two things that I struggled with.

1. Was getting frustrated because driver side headlight connection wouldn't reach. Got under the car and gave it a slight tug and realized it was caught on something. Crisis averted.

2. When you have it mostly buttoned back up and admiring your work...make sure you put the damn crash beam back on first...

BRB tearing it apart again :)

BTW, I mounted the harness as shown in the instructions. In retrospect, probably not a good idea as it looks like the harness only had contact on the edges and not in the middle. Guess I'll know if the harness falls off.
Good time to update this thread as it was bumped yesterday.

Regarding my controller for my lights, the tape failed and now the controllers just sit there. They don't seem to be going anywhere but American Muscle sent me some extra 3M tape for when I want to fix it.
 

steven

Well-Known Member
Joined
Sep 21, 2015
Threads
4
Messages
144
Reaction score
56
Location
houston,tx
Vehicle(s)
2015 mustang gt black
question, If i buy just the lights...do you think they will fit the MMD grille? seems like that portion of the grille is the same ?
IMG_6844222.JPG
Sponsored


Top