Sponsored

DD DRL Boards

CasperGT

Well-Known Member
Joined
Aug 6, 2016
Threads
2
Messages
734
Reaction score
1,091
Location
Brisbane - Australia
First Name
Allan
Vehicle(s)
GT Black Fastback (Drake)
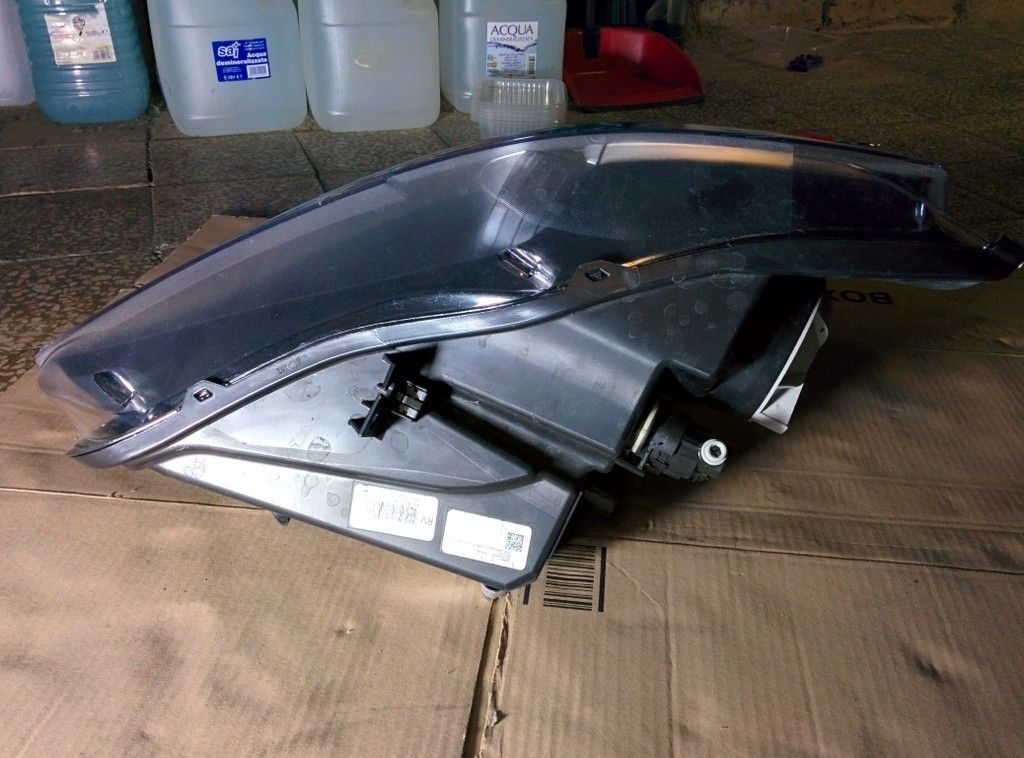
You will love them! This is mine, I alsoblacked out the reflector and chrome except for the last ring.

Thanks for the tip about the Sika vapours.

I've traced the wire colours from the various lights, and found almost no relation to the colours in the DD instructions??!! Did you keep notes on what colours you connected to?
image.png
Sponsored


steerage250

Well-Known Member
Joined
Jan 7, 2016
Threads
22
Messages
255
Reaction score
158
Location
Perth
First Name
Ian
Vehicle(s)
2016 GT Fastback, 1928 Model A Ford
DIY tri-bar DRLs done

- and only one piece left-over! (That's a pass mark isn't it?) The left-over piece (see blurry photo) looks like something that tidied-up a bit of wiring harness somewhere (can't be vital :)).
IMG_1423.JPG
IMG_1425.JPG
IMG_1426.JPG
 

papinist

The Italian Pony
Joined
Nov 30, 2014
Threads
47
Messages
3,188
Reaction score
781
Location
Tuscany, Italy
First Name
Stefano
Vehicle(s)
Mustang EcoBoost MT Race Red EURO - NO MORE
That clip sits on top of the headlight (or the bottom?) and is used to 'snap' the light in place before you put the bolts on. Once you fixed the lights with bolts you are ok also without that :)


steerage250

Well-Known Member
Joined
Jan 7, 2016
Threads
22
Messages
255
Reaction score
158
Location
Perth
First Name
Ian
Vehicle(s)
2016 GT Fastback, 1928 Model A Ford
That clip sits on top of the headlight (or the bottom?) and is used to 'snap' the light in place before you put the bolts on. Once you fixed the lights with bolts you are ok also without that :)
well - I am VERY glad I don't need to pull the bumper off again to put the clip back in ! :)
 

Sponsored

steerage250

Well-Known Member
Joined
Jan 7, 2016
Threads
22
Messages
255
Reaction score
158
Location
Perth
First Name
Ian
Vehicle(s)
2016 GT Fastback, 1928 Model A Ford
Revised wiring for DD switch-back kits for RHD

Below is what I believe are the wire colours I ended-up connecting to on my Aussie RHD car. Can anyone else confirm these colours ? (If so, I'll let DD know so they can update their wiring schedules).
Revised DRL wiring.JPG
 
Last edited:

MakStang

Well-Known Member
Joined
Dec 11, 2016
Threads
15
Messages
1,678
Reaction score
265
Location
Greece
Website
www.cellentis.uk
First Name
Makis
Vehicle(s)
A 2017 miraculous little beast
4. I'm not convinced about the security of the wire-tap connectors included with the DD kit, and suggest wrapping them with tape to prevent them becoming disconnected.
[MENTION=20783]steerage250[/MENTION] Regarding your 4th point above, let me share my experience with you all. First of all, these DRL boards are great. European Mustangs (like Australian ones) come without those shark gills DRLs, so these boards completely changed the personality of my car. Plus DD offers an unparalleled customer service.

I installed the Diode Dynamics' new tribar LED Boards with sequential turn signal a couple of months ago. At first they were working perfectly. A few days after the installation, the DRL function of one of them (the right one) was not working (all other functions were OK). I contacted Paul through the forums and, after following his detailed instructions, I found out that one of the T-Tap connectors was not making the connection very well. I fixed it with pliers and then everything was back to normal...

...until a couple of days ago! Now the left one was not working when the headlights were on or when I put the switch to the parking lights position. After reaching for the relevant connection through the wheel well liner, I realized once again that the T-Tap connector was not making a good connection. I tried to fix it like I did for the right one, but it wouldn't stay on permanently.

So I decided to do what I never wanted: remove the front bumper (again :doh:) in order to do the connections the right way. I withdrew the faulty T-Tap connectors and I took my time to splice carefully the wires on all connections the old traditional way. After splicing them, I wrapped each connection initially with normal electrician's tape and then I used self-fusing rubber tape in order to make the connections strong, waterproof and heat resistant. For that I used 3M Scotch Rubber Splicing Tape 23 (http://solutions.3m.com/wps/portal/...h-Rubber-Splicing-Tape-23?N=4294922059&rt=rud).

Now everything works perfectly, as it should be and everything seems to be heat and water resistant. I believe that they will last forever. If you decide to use Diode Dynamics' front tribar DRL boards, I strongly - STRONGLY - suggest that you replace the inefficient T-Tap connectors when you first install them. The probabilities are that sooner or later they will stop working properly, you will be pissed off and you will have to do everything all over again, like I did... :shrug:

If anyone needs a quick 101 on car wire splicing, here is a very useful link (I used the Westinghouse Split): http://www.musclecardiy.com/automot...motive-electrical-connections-and-connectors/
 
Last edited:

steerage250

Well-Known Member
Joined
Jan 7, 2016
Threads
22
Messages
255
Reaction score
158
Location
Perth
First Name
Ian
Vehicle(s)
2016 GT Fastback, 1928 Model A Ford
[MENTION=20783]steerage250[/MENTION]I withdrew the faulty T-Tap connectors and I took my time to splice carefully the wires on all connections the old traditional way.
Thanks Makis, knowing your experience now, I would have soldered them while I had the bumper off and be done with it once and for all. (Having said that, swapping the red and white over to make them work correctly wouldn't have been such a simple exercise :))

I might add your experience to my suggestions & recommendations in my previous post.
 

MakStang

Well-Known Member
Joined
Dec 11, 2016
Threads
15
Messages
1,678
Reaction score
265
Location
Greece
Website
www.cellentis.uk
First Name
Makis
Vehicle(s)
A 2017 miraculous little beast
No problem. After installing them I also had to swap the red and white over to make them work correctly, but I did it from the top and through the wheel well liner. Not an easy task indeed...

Anyhow, if you ever decide to take your bumper off again, take your time to remove the crappy T-Tap connectors. If you use the self-fusing tape that I described in my post, you will be able to make tight and water resistant connections that will last forever, so there is no need to solder - unless you want to. :cheers:
 

Sponsored

CasperGT

Well-Known Member
Joined
Aug 6, 2016
Threads
2
Messages
734
Reaction score
1,091
Location
Brisbane - Australia
First Name
Allan
Vehicle(s)
GT Black Fastback (Drake)
[MENTION=20783]steerage250[/MENTION] Regarding your 4th point above, let me share my experience with you all. First of all, these DRL boards are great. European Mustangs (like Australian ones) come without those shark gills DRLs, so these boards completely changed the personality of my car. Plus DD offers an unparalleled customer service.

I installed the Diode Dynamics' new tribar LED Boards with sequential turn signal a couple of months ago. At first they were working perfectly. A few days after the installation, the DRL function of one of them (the right one) was not working (all other functions were OK). I contacted Paul through the forums and, after following his detailed instructions, I found out that one of the T-Tap connectors was not making the connection very well. I fixed it with pliers and then everything was back to normal...

...until a couple of days ago! Now the left one was not working when the headlights were on or when I put the switch to the parking lights position. After reaching for the relevant connection through the wheel well liner, I realized once again that the T-Tap connector was not making a good connection. I tried to fix it like I did for the right one, but it wouldn't stay on permanently.

So I decided to do what I never wanted: remove the front bumper (again :doh:) in order to do the connections the right way. I withdrew the faulty T-Tap connectors and I took my time to splice carefully the wires on all connections the old traditional way. After splicing them, I wrapped each connection initially with normal electrician's tape and then I used self-fusing rubber tape in order to make the connections strong, waterproof and heat resistant. For that I used 3M Scotch Rubber Splicing Tape 23 (http://solutions.3m.com/wps/portal/...h-Rubber-Splicing-Tape-23?N=4294922059&rt=rud).

Now everything works perfectly, as it should be and everything seems to be heat and water resistant. I believe that they will last forever. If you decide to use Diode Dynamics' front tribar DRL boards, I strongly - STRONGLY - suggest that you replace the inefficient T-Tap connectors when you first install them. The probabilities are that sooner or later they will stop working properly, you will be pissed off and you will have to do everything all over again, like I did... :shrug:

If anyone needs a quick 101 on car wire splicing, here is a very useful link (I used the Westinghouse Split): http://www.musclecardiy.com/automot...motive-electrical-connections-and-connectors/

I don't understand why you needed to remove the bumper? Put on jack stands Take the wheels off and spend 2 minutes to take the plastic inner well liners off and you have full access to the wiring.
 

CasperGT

Well-Known Member
Joined
Aug 6, 2016
Threads
2
Messages
734
Reaction score
1,091
Location
Brisbane - Australia
First Name
Allan
Vehicle(s)
GT Black Fastback (Drake)
Below is what I believe are the wire colours I ended-up connecting to on my Aussie RHD car. Can anyone else confirm these colours ? (If so, I'll let DD know so they can update their wiring schedules).
They have been told several times.
 

MakStang

Well-Known Member
Joined
Dec 11, 2016
Threads
15
Messages
1,678
Reaction score
265
Location
Greece
Website
www.cellentis.uk
First Name
Makis
Vehicle(s)
A 2017 miraculous little beast
I don't understand why you needed to remove the bumper? Put on jack stands Take the wheels off and spend 2 minutes to take the plastic inner well liners off and you have full access to the wiring.
Good point mate!

Wish I had jack stands. They are on my "to buy" list! :cheers:
 

CasperGT

Well-Known Member
Joined
Aug 6, 2016
Threads
2
Messages
734
Reaction score
1,091
Location
Brisbane - Australia
First Name
Allan
Vehicle(s)
GT Black Fastback (Drake)
Bumper removal issue

Hey just to inform those who do not know already. When you take your bumper off you needed to disconnect the air bag and bonnet deployment sensor loom connecter on the drivers side.

The CANbus (Computer Access Network) is permenantly positive charged and when you disconnect the sensor plug it generates an error code that can only be detected by the port terminal interface. You need to have the error code cleared but the main point is that when the mechanic tells you a problem with the airbag system has been registered you will know why.
 

CasperGT

Well-Known Member
Joined
Aug 6, 2016
Threads
2
Messages
734
Reaction score
1,091
Location
Brisbane - Australia
First Name
Allan
Vehicle(s)
GT Black Fastback (Drake)
Good point mate!

Wish I had jack stands. They are on my "to buy" list! :cheers:
Seriosuly Makis, they make the job 100 times easier. Best things ever. Also, I put the jacking rails on and so so so pleased I did. They make life so much easier.
Sponsored


Top